Introduction
The number and configuration of your document types is adjustable. Document types in Sophora are defined in the Compact Namespace and Node Type Definition (CND) notation of Apache Jackrabbit (see also node type notation at the Jackrabbit homepage). Document types are composed of two different elements: properties and childnodes. Childnodes themselves may contain other document types. Thus, you can combine properties and childnodes almost arbitrarily to meet your individual requirements and configure your document types accordingly. You can determine - for each document type individually - the labelling of the entailed elements, a corresponding icon, whether it should be creatable via the New Document menu, whether it should be searchable for users, which elements appear on which editor tab and much more.
Documents and childnodes are themselves node types. The relationship between node types and properties is displayed on the right.
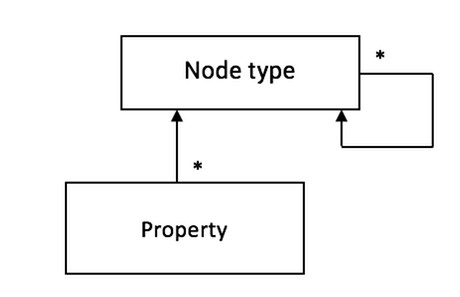
Furthermore, you can provide a default configuration for every property and every childnode. Such a default configuration may be overwritten within an actual document type configuration.
Besides default configurations of single properties or childnodes you can create Form Field Groups. These groups allow to reuse a configured set of properties and/or childnodes, which often or always appear alongside each other. For example, you can create a group with common meta data fields and assign this single group to multiple document types. Moreover form field groups allow to layout input fields side by side in up to four columns.
You can also configure Yellow Data properties to be visible like normal properties in a document. These are called virtual properties, because the value is not stored inside the document, but in Yellow Data. Therefore these properties are always read-only. The values will be copied by the server from the Yellow Data into the document when the document is loaded. Only the configuration makes these properties part of the document.
Creating and Extending Document Types
If you want to create a new document type or extend an existing one, you have to go into the administration view. If it is not visible, open it via User >> Views >> Other... >> Administration. Expand the menu item Document Configuration and go to Node types.
If you want to create a new node type, just open the context menu on the menu item Node types or any menu item below and select New: Node type. Then, the node type editor opens with an empty page, where you have to enter a node type in CND notation. The editor supports syntax validation, syntax highlighting, auto completion and context assist (using Ctrl + Space).
If you want to edit an already existing node type, just open one from the administration view. If there is already a configuration for this document type, change to the CND tab. If not, the CND tab is shown initially. Here, you can extend the document type's definition only by adding properties (with a '-') or childnodes (with a '+').
Here, you can get an overview which types you can use.
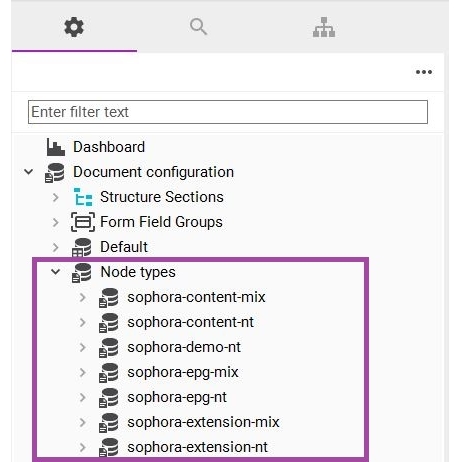
Namespaces
Document types should be declared in several namespaces, which represent some conventions for better structuring within your repository.
- The namespace name of node types ends with -nt, which stands for node type; for instance
sophora-nt:story. - The namespace name of mixin types ends with -mix, which stands for mixin; for instance
sophora-mix:document. - The namespace name of properties and childnodes of node or mixin types does not end with -nt or -mix. Such elements do not have any suffixes; for example
sophora:headlineorsophora:id.
However, an empty Sophora instance provides some predefined namespaces that are used internally:
sophora-nt: Contains all node types Sophora needs (e.g.sophora-nt:user,sophora-nt:role,sophora-nt:structureNode2, and so on).sophora-mix: Contains all mixin types Sophora needs (e.g.sophora-mix:document,sophora-mix:systemDocument, ...).sophora-extension-nt: Contains all additional node types Sophora needs dependent on the domain requirements (e.g.sophora-extension-nt:copytext,sophora-extension-nt:image, ...).
Domain specific node types and mixin types should be created in their own namespace following the conventions above, e.g. domain-nt:documentType, domain-mix:document, domain:propertyName, domain:childnodeName, ...
Some Sophora-Addons also deliver an additional namespace as you can see in the screenshot above (sophora-epg-nt). In this tutorial the sophora-content-nt and sophora-content-mix namespaces are used for domain specific node types and mixin types.
Document Extensions
Sophora comes along with a set of predefined document extensions which can be enabled by pushing a single button. Document extensions are type definitions for one or more childnodes in CND format that can be used within other document types. They are basically a shortcut mechanism. Such predefined extensions can be found at the correspondent menu item within the administration view. To activate a selected extension simply click the "Register" button next to the extension list.
For instance, the document extension "Copytext" registers the childnode type "sophora-extension-nt:copytext" and all required childnode types:
"sophora-extension-nt:paragraph","sophora-extension-nt:paragraphimage"and"sophora-extension-nt:paragraphlink"
The document extension, talking of the actual childnode type "sophora-extension-nt:copytext", can now be used within other document types such as the above "sophora-content-nt:story" example.
In addition to document extensions there are also ready-to-use, predefined document types. You find them behind a sub entry of the "Document types" menu within the administration view. These document types are activated in the same way as the document extensions: Mark a certain entry and click the "Register" button next to the document type list.
CND Without Configuration
After you have created and saved a new document type, you can just see the tab CND in the node type editor. For some purposes, you do not need further configuration for your node type. This is the case, for example, for many document types from the sophora-nt namespace, because they are only needed for background data storage.
Adding the keyword multiple to an arbitrary property or childnode enables the field to store multiple values at once. You can declare a document type as subtype of another document type: For example, refBase is a general document type for reference fields, while imageref is a document type just for image references. To instantiate this inheritance relationship, you have to declare the name of the node type sophora-content-nt:imageref the following way:
['sophora-content-nt:imageref'] > 'sophora-content-nt:refBase'
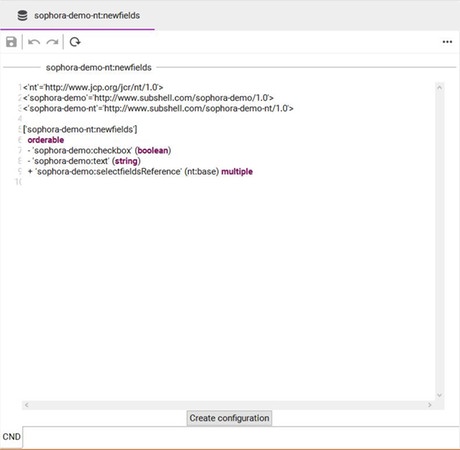
Remember: you can add properties with a '-' and childnodes with a '+'; in the example on the righthand side, sophora-demo:text is a property, while sophora-demo:selectfieldsReference is a childnode.
After you have created a node type, the node type editor should look like this:
Creating a Configuration
If you wish to configure the appearance of your document type or to specify its properties, you must now hit the button Create Configuration. In the emerging dialog, select which of your tabs should be used by your document. By default, the tabs Base and Meta are selected. If you are not sure instantly, which tabs you may and may not want to use, you can add or remove available tabs later. You can do this by opening the corresponding tab document and (de-)selecting the document type. After you chose the tabs, press OK.
Now, the node type editor reopens and you will see five different tabs which will be explained one by one in a minute. You still can go to the tab CND and add new properties.
Attributes of Document Types
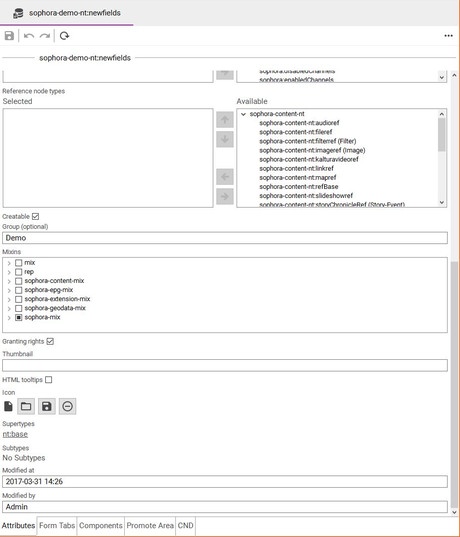
On the tab Attributes, you can configure your new document's appearance and enable or disable some basic functionalities:
- Label, Label (Plural): The name of the document type as it is displayed in the user interface, e.g. within the New Document
menu.
- Description: A brief description of this document type.
- Help-URL: The URL of a web page that provides editing help for this document type. Users may press F1 in an opened document editor to open the web page in their web browser.
- Opening Tab: The tab which should be displayed by default if a document of this tab is opened. If nothing is selected, the tab Base will be the opening tab.
- Not Searchable: Determines, whether documents of this type are shown in the search result.
- Search Label: A label for searchable node types, e.g. story. Users are able to search documents of that type by entering =<search label of the node type> within the search text field of the Sophora DeskClient, e.g. =story. The label is displayed in the search toggle button, too. If no search label is defined, a document of this type will not be displayed in any search result and cannot be searched through the search view.
- Document Label: The property or expression that represents a document of this type when it is referenced in other documents, within search results, proposal sections, bookmarks and so on. The field is also used for the display label of components and component boxes within the component structure of a document. Select a single property like
sophora-content:title,sophora-extension:title, ... or type an expression likeTitle: ${sophora-content:title|No Title} (Slots: ${sophora-teletext-nt:slotAllocationInfo/sophora-teletext:formattedWorkingSlots}). The variable declarations (${<property name>}) can refer to direct single or multi properties of the document, as well as virtual properties (yellow data). If the property has no value a default value can be given after a pipe. If no default value is given a fixed default will be used ("<No value>"). The value will be displayed in a human readable form (richtext will have the formats removed, dates will be formatted and so on). For boolean properties the label of the property will be displayed if it istrue. See configuration propertycomponentstructure.useDocumentReferenceLabelto enable this behavior for components. - Document Description: The value of this property is displayed when the document is referenced in copytext boxes.
- Document Information: Names of the properties that should be part of the abstract that represents a document within the search result list additionally. Here, you can also change the ordering of these added properties. If this list is empty, only the default information is provided within the search result entry.
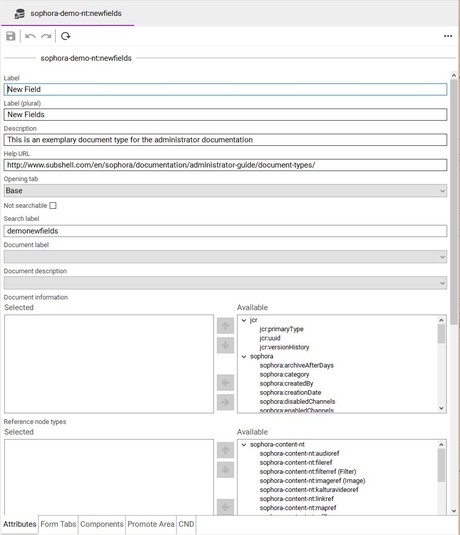
- Reference Node Types: The document type that is used when the document type at hand is referenced/used by another document. This reference node type may contain fields for replacing/overwriting values from the original document.
- Creatable: Determines, whether this document type can be created using the
New Document menu.
- Group: You may also provide the name of a group which comprises interrelated document types.
- Mixins: The associated mixins add extra fields to a document type. For example, a document or its components and properties can only be protected, if the document type has the mixin
sophora-mix:protectable. Removing a mixin results in the disappearance of the properties and childnodes from the document type at hand. In particular, mixins can be removed from a document type (in contrast to properties from the CND). - Granting Rights: Determines, whether an access authorisation can be configured in the role editor for this node type. If this box is not checked, a document of this type cannot be created.
- Thumbnail: An expression that determines which image is used as thumbnail for this document type. In default cases, the prefix
uuidshould be used, and after this prefix you just have to declare the path to the image reference property which points to the desired thumbnail image, e.g.:uuid:sophora-content:teaserImage/sophora:reference. In special cases you might skip the prefixuuidand can use an arbitrary xpath expression which points to the binary data of an (image) document. - HTML Tooltips: Specifies whether HTML tooltips should be shown for documents of this document type or not. See section Preview Tooltips for further information.
- Default-Icon: Defines the icon that is displayed for documents of this type. The icon can be set depending on the document's content. For that to happen, a select value document containing icons needs to be configured for the
sophora:documentIconproperty. The document's icon then will be set according to that select value. - Supertypes: A list of node types this document type extends. Thus, if multiple node types appear in this field but the CND only contains a single super type, the immediate parent node type extends another node type itself. You can click each of these node types to enter the individual configuration. Every node type extends the type
nt:base. - Subtypes: A list of subordinate node types. You can click on each of these node types to enter its individual configuration.
Configuring a Document's Properties and Childnodes
In the previous section, you have learned how to create and extend a document type. You have done this by adding properties to the CND of the document. In the CND, you assign just simple types to the properties, such as string or boolean. But you have the possibility to specify precisely, which appearance a property should have in the Sophora DeskClient. For example, you can define that one property of the type string is a simple text field, while another string property should be configured as a select value. You can get an overview about all available input field types in this article. Here, we will explain to you how to configure a property in the node type editor.
For every property of a document type you can define on which tab it should appear within the document editor. There might be a default configuration for every property that may be overwritten here. Thus, if multiple document types share the some properties, it might be handier to define a default configuration for such properties so that you do not have to do the configuration over and over again. However, values that are resumed from the default configuration are displayed in grey font. Overwritten values or values that are solely configured in this very document type are displayed in standard black font. A property name displayed in grey font indicates that there only a default configuration but nothing is configured in the present document type.
Configuring Editor Tabs
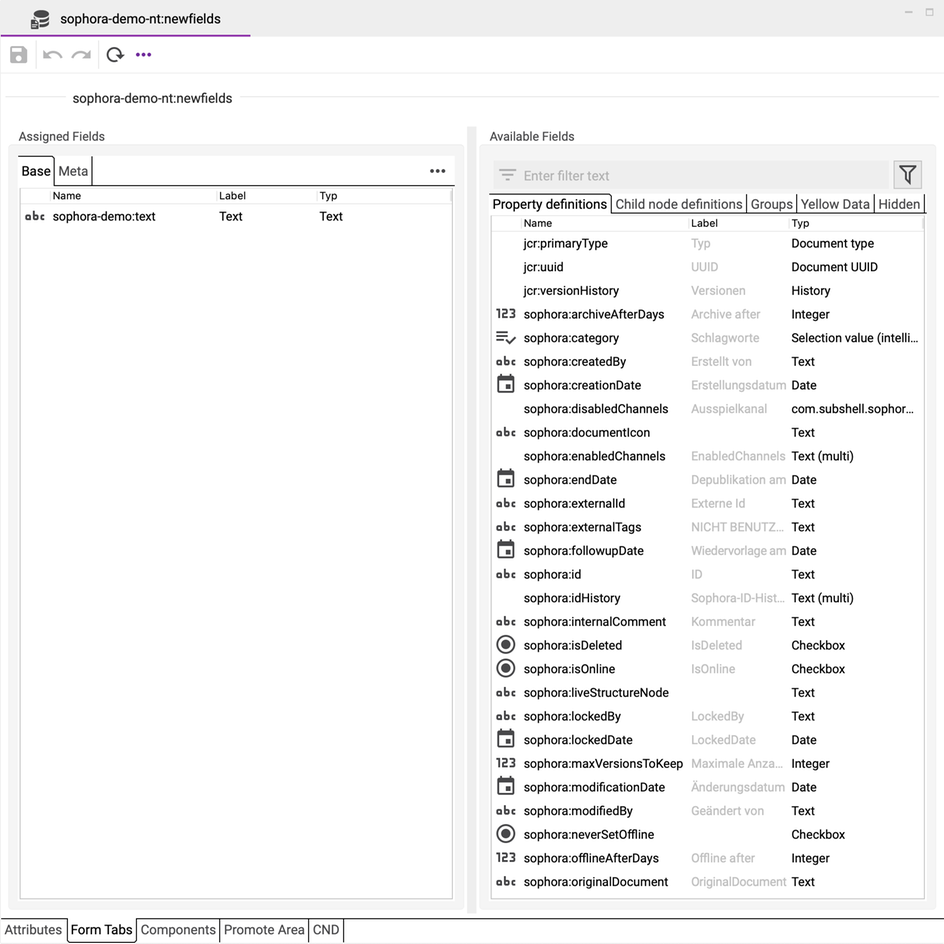
You can configure every property on the node type editor tab Form Tabs, which you can see in the illustration on the right. On the left side of the tab you will find the area Assigned Fields. There, you can determine on which editor tab each field shall be located. On the right side, you will find the area Available Fields, where you can see every property available to you. These properties originate from the CND configuration, from one of the selected mixins for this document, and from node types with the sophora-mix:yellowData mixin. You can add single properties, childnodes, groups and Yellow Data properties to the document. If a property is assigned to a tab, it will be hidden from the available fields. However, if you want to add this property to another tab, click on the filter icon at the upper right corner of the available fields area. All hidden properties then will be displayed with dark blue letters and you can assign them to another tab.
The order in which the properties are arranged within the node type editor is the order of the properties in a document editor of this type.
If you want to show a property on every available tab of the document, probably the document's title, you can use the promote area. The promote area and all its assigned fields will be shown atop the document editor, independent from which tab of the document is opened at the time. To assign properties to the promote area, instead of using the Form Tabs tab in the node type editor, you can use the Promote Area tab. They have basically the same layout, you just assign a property not to a single tab, but to all of them at once.
Editing the Configuration of a Property
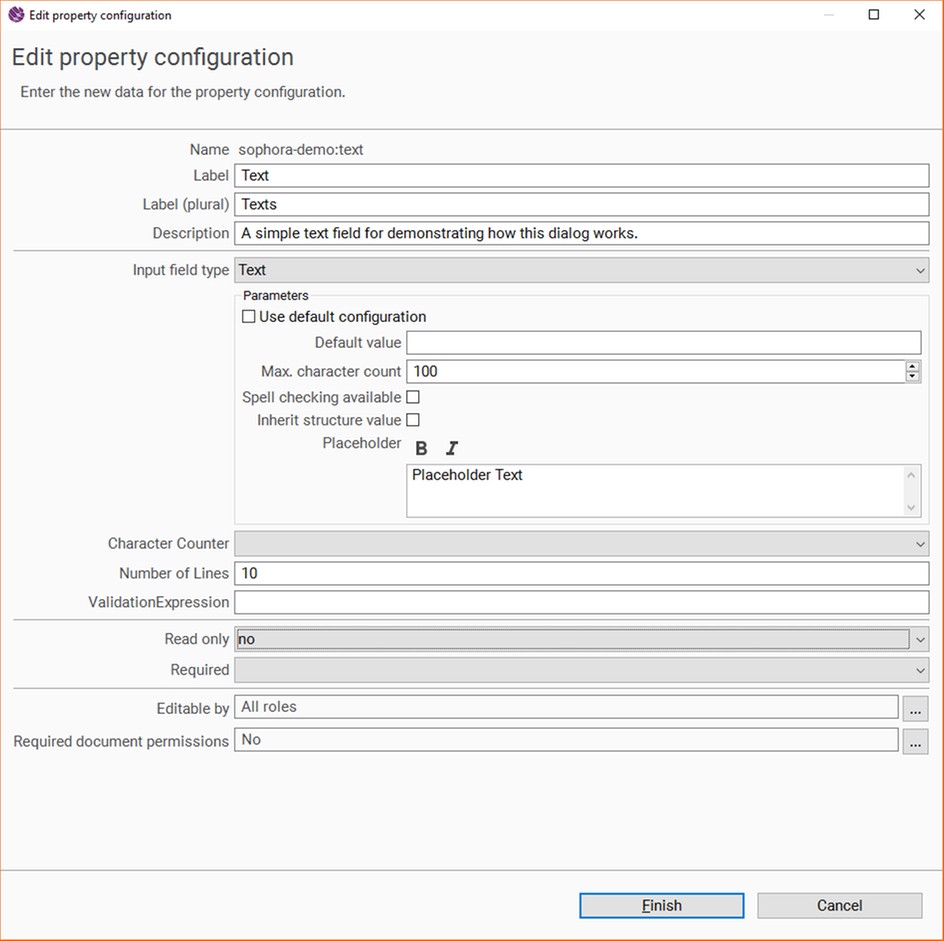
The layout of the dialog Edit Property Configuration varies depending on which input field type is selected. But most configuration parameters hold for every property. You can configure a property by double clicking it on the Form Tabs or Promote Area tabs, whereupon the dialog opens. All available properties are:
- Name: The name of the selected property. This field is read only, because you cannot alter the properties name once it is set.
- Label/Labels: The label of the field which will be displayed in the Sophora DeskClient.
- Description: A description for the field, which will be shown in the fields tooltip.
- Input field type: Here, you can select which input field type the document should have. For example, a string property can be a text field, but also a select value. You get a full summary of all available input field types here.
- Every property between the separator lines above and below the label Input Field Type depend solely on that field. For example, if the input field type Text is selected, you can also define the number of lines, a validation expression, and if a character counter should be displayed next to the field. If a different input field type is selected, there may be totally different options.
- Read only: Specifies if the property should be a read only property. Default is no.
- Required: Specifies if the property should be a mandatory field. Default is no.
- Editable by: You can restrict which roles may edit a property (see also here). Default is All Roles.
- Required Document Permissions: You can decide, that users need a special document permission to edit a property (see also here). Default is none.
- jcr:uuid
- sophora:externalId (string)
- sophora:id (string)
- sophora:idHistory (string) multiple
- sophora:createdBy (string)
- sophora:creationDate (date)
- sophora:modificationDate (date)
- sophora:modifiedBy (string)
- sophora:lockedBy (string)
- sophora:lockedDate (date)
- sophora:site (string)
- sophora:structureNode (string)
- sophora:liveStructureNode (string)
- sophora:state (string)
- sophora:isOnline (boolean)
- sophora:publicationDate (date)
- sophora:publishedBy (string)
- sophora:isDeleted (boolean)
- sophora:originalDocument (string)
Configuring a Document's Childnodes
More complex elements of a document type are given as childnodes. For each childnode you can define on which editor tab it should occur in documents of this type. There can also be a default configuration for childnodes that may be overwritten in each document type configuration. The childnode setting has to be defined on the correspondent tab. Values that are resumed from the default configuration are displayed in grey font. Overwritten values or values that are solely configured in this very document type are displayed in standard black font.
Childnodes usually comprise a certain set of properties and other childnodes and summarise a specific behaviour like special input fields. By default, there is a set of predefined childnodes for the most common purposes. For convenience there are also some additional document extensions that need to be registered in Sophora before they can be used. Examples for childnodes are the copytext, teaser images or references to audio/video files. A dynamic table is a special kind of a childnode.
There are two different ways to use a childnode:
When the value of a childnode should be entered manually, their corresponding input field type needs to be associated and this childnode must not be configured on the components tab. This way works almost equal to the configuration of properties.
When the childnode serves as a container for a referenced document, thus a component, it must not have an input field type assigned and has to be configured on the components tab. About this way you will learn more in the next section.
In general, childnodes can only be shown on tabs of the type "Form" (see page Configuring the Deskclients for details about tabs). By default, there are the following tabs available:
base – For fundamental childnodes of this document type.
meta – For childnodes about a document; hence containing meta information.
components – Many childnodes are handled as components and thus might be viewed or edit on the "Components" tab but also within the "Components Structure" view.
A Childnode as an Input Field Type
After you have added a new childnode on the CND tab, it will appear on the right-hand side of the node type editor. You can use it in two different ways.
First, you can use it as an additional input field type. This can be useful, if you would like to add additional features to an input field, e.g. if you not only want to have a plain text field, but also would like to integrate images directly between the paragraphs. Therefore, you have to drag and drop the new childnode on the tab Form Tabs, just as you do with regular properties. The childnode configuration dialog works just as the property configuration dialog, except the fact that there are no default input field types for childnodes. A full list of available input field types for childnodes and their setup is given here.
A Childnode as a Component
If you want to add components, such as images to a document, you have to drag and drop them onto the tab Components of the node type editor. There, you can edit the childnode configuration as you are used to, but the childnodes will not appear in the regular document editor, but rather in the components view.
Structuring a Document
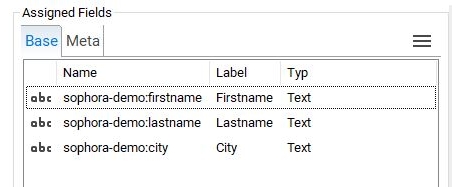
You can determine in which order the input fields of a document appear in Sophora DeskClient. Nothing could be easier - properties and childnodes will be displayed exactly as you have ordered them in the node type editor. For example, consider the illustration on the right, which shows the Form Tabs tab of the node type sophora-demo-nt:person. Any document of that type, that you open in the editor, displays the properties sophora-demo:firstname, sophora-demo:lastname and sophora-demo:city on the Base tab, namely in that order.
Form Field Groups
If you have multiple properties, which should be displayed altogether in some or all documents, Sophora has an easy and convenient solution for you - Form Field Groups. To any Form Field Group, you can assign a bunch of properties and add them to any document, without adding them to the document's CND. Thus, you can also easily remove them later. To create a Form Field Group, open the view Administration, and go to Document Configuration >> Form Field Groups, open the context menu and select New: Form Field Group.
The Form Field Group Editor
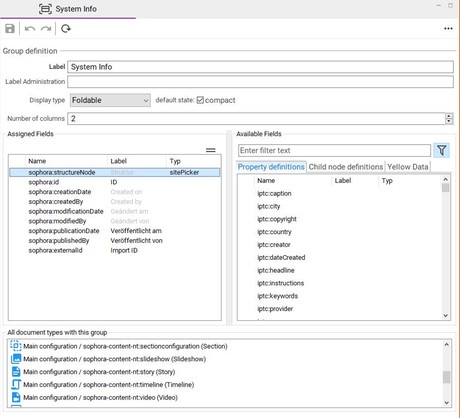
You can see and edit the following features of a form field group:
- Label: the name that is displayed in documents to that the group is assigned. This field is mandatory.
- Label Administration: the name, that is displayed in the view Administration.
- Display Type: you can select four different display types for each form field group. No Highlighting - All of the group's properties are still displayed together, but the group is not recognizable as such. If such a group is placed after a group with highlighting they will be visible in one common box. Border - the group is arranged in a separate box. Border with Label - the group is arranged in a separate box, and the configured label is displayed at its top. Foldable - the group is arranged in a separate box, that can be collapsed. You can additionally choose, if the form field group should be collapsed by default or not.
- Number of colums: you can choose, in how many columns the group's properties should be arranged. Choose between 1 and 4.
- Assigned Fields/Available Fields: the right side Available Fields offers you every single property that is available. the left side Assigned Fields shows you, which fields you have already put into the form field group in which order. You can move fields between those two lists using drag and drop.
- All document types with this group: you cannot change anything here, but you can gain a quick overview, which document types are using this form field group. You can open each document type's node type editor via double click.
Assigning Form Field Groups to a Document
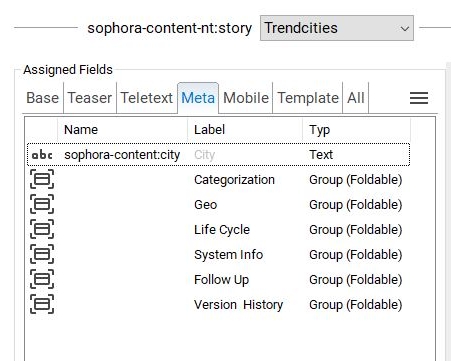
Assigning form field groups to a document works just the same as doing so with single properties or childnodes - on the tab Form Tabs, drag them from Available Fields to Assigned Fields. On the Available Fields side, you just have to open the tab Groups to find all of them.
Default Property Configurations
For each property that should be used within (multiple) document type configurations, you can define a default configuration. Thereby, you can provide standard appearances and behavior for all your properties. A default configuration provides a standard setting for all properties with the exact same name and type, independent of the tab or document type it is placed on. However, any default configuration may be overwritten, i.e. replaced, in any specific document type configuration. If you configure a document's property in the node type editor, any settings it obtains from its default configuration are displayed in grey font.
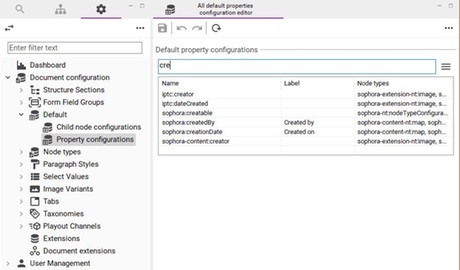
To add or edit a default configuration for a property, proceed as follows:
- Navigate to Document configuration >> Default >> Property configurations.
- Select the property in the list. You can search for it in the text field above. Every available property will be displayed.
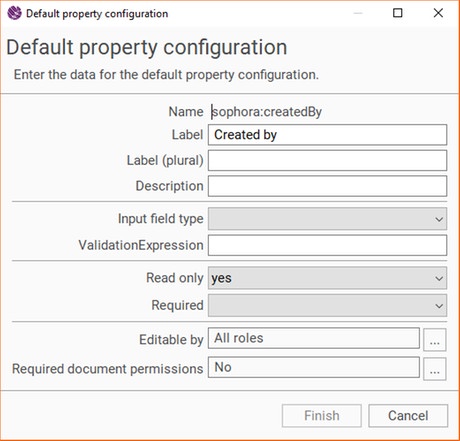
- By double clicking a property, a dialog for editing the default values opens. The dialog is very similar to the usual dialog for editing a property configuration.
- You can configure a default configuration for any number of the available properties.
- Remember to save the default properties configuration document afterwards.
Default childnode configurations
Defining a default configuration for a childnode works just the same as doing so for a simple property. Likewise, all default childnode configurations can be overwritten in any specific document configuration.
Document Templates
When creating new documents, it is possible to define default values for any kind of input field, including the ID stem and the structure node. This can be achieved using Document Templates. All of these predefined values may be replaced by the user.
Create a new document template, by selecting New >> Template, as any other document. Mandatory fields are Name and Template Document. The Name can be specified arbitrarily, whereas the Template Document field shall reference another actual document, which then serves as the template. Additionally, you can select a structure node, where all documents created from this template are located by default.
Node Type Configuration Variants
If a certain document type is referenced in different contexts or settings, it is possible to create node type configuration variants. That way, you can define varying input forms for the Component details view for the same reference node type. Consider the following example: you write an article and you would like to advertise another article with additional content. You would put this article prominently in a box, where you have rather much space available. So you would like to show not only the title of the other article, but also a small teaser text and a teaser image. On the other hand, you may want to refer the reader to the last articles about the same topic, e.g. if it is an ongoing news story. You would put these together in a teaser list, and because there is not that many free space, you would like to show only the articles' headlines. Therefore, you create a node type variant.
You can create a new node type variant by opening the administration view and going to Document configuration >> Node Types and then the selected node type, in our example sophora-content-nt:storyref. Open the context menu of the node type and select New: Node type configuration variant. Enter a name and press OK. Subsequently, the node type editor opens, where you can switch between the node type's main configuration and the new variant (see illustration on the right).
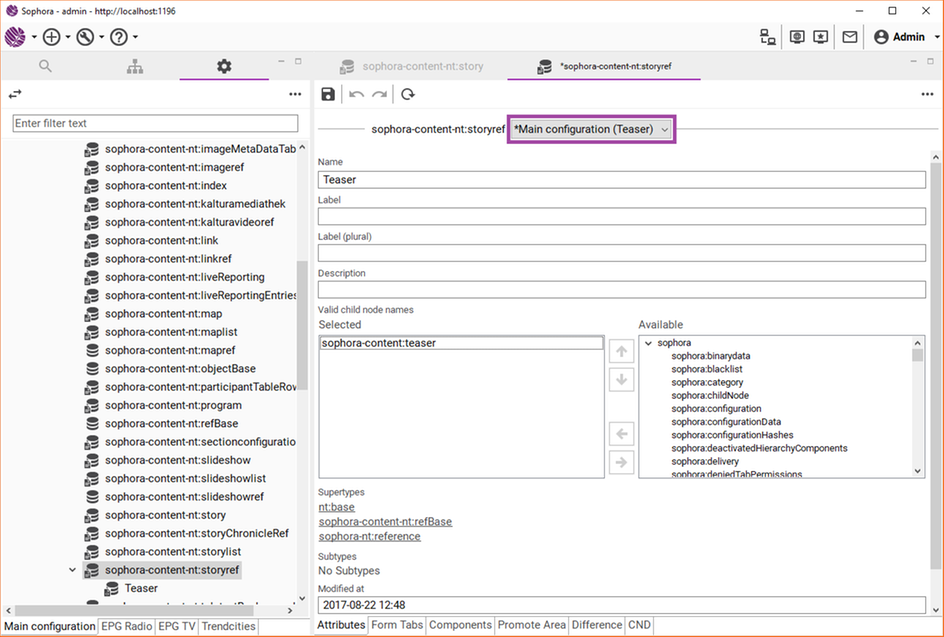
On the Attributes tab of a document type variant, you can determine for which references this variant should apply. Therefore, you have to specify the names of the childnodes in the field Valid childnode names that might be used within other document types' CNDs - in our example sophora-content:teaser. The effect is the following: if a document references a story (using the node type sophora-content-nt:storyref), in the Component details of the referenced story will display every property which is configured on the Base tab - except if the story is referenced in a childnode with the name sophora-content:teaser. Then, the details which are configure to the Base tab in the cofiguration variant Teaser are displayed.
Structure Sections
Besides variants for references, you can also create completely different configurations for particular structure nodes or structure paths. Documents of a certain type might show different form fields depending on the location of the document. For example, you might have an article series about the world's capitals, which are located under a specific structure node. All these articles shoud have two properties called sophora-content:location and sophora-content:country, which all other articles should not have. For this purpose, you can create structure sections. Each section contains different structure nodes and can overwrite the default configuration for this structure section and this section only.
Creating a Structure Section
Structure sections are a special document type. To create one, open the view Administration and go to Document Configuration >> Structure Sections. Open the context menu and select New: Structure Section. Enter an ID-stem and select the structure node where the structure node document itself should be located.
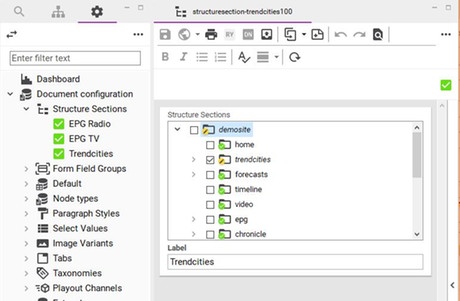
In the structure node document, the field Label is mandatory. This is the name of the structure section. Above, you can select the structure nodes that should belong to this section, in the illustration on the right that is every structure node below /demosite/trendcities.
Configuring Documents Inside Structure Sections
If you want to create a new configuration for a document type inside a structure section, proceed as follows:
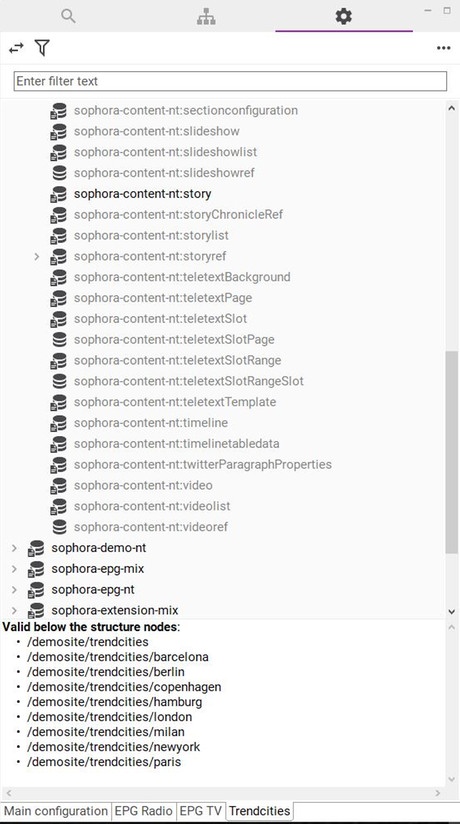
- Open the view Administration. At its bottom, you can see an additional tab for every structure section that you have created. Click on the desired structure section.
- Every node type with a section configuration for the selected structure section is now displayed in black, every other node type without a configuration for this section is displayed in grey. Open the context menu on the node type you want to create the section configuration for and select New: Node type section configuration.
- If you cannot see any node types, disable the filter in the upper left corner of the view.
A copy of the existing configuration will be created. The editor of the newly created node type configuration will be opened automatically. On top of the normal node type editor you see a dropdown menu to switch between the main configuration, variants and configurations in structure sections.
You can now configure the document type as you would do it in the main configuration, except not all fields are available on the tab Attributes because some attributes cannot be overwritten and will be inherited from the main configuration. Additionally, on the tab Form Tabs, you can move a property or childnode in all configurations to the same tab by using the context menu. Also, when editing a property or childnode, a second page of the dialog allows you to copy your changes to other configurations. By default, all configurations which are identical are selected.
Im- and Export
As with all other documents and system documents, you can export your node type configuration and import an already existing one. In general, you can export all configurations from the server you are logged on to and re-import them to another server (but also to the origin). It is required, that both Sophora servers are run in the same version. If you need to im- and export using different versions anyway, you have to edit the exported files manually to fit these files into the target version's format.
.xml-Files, except the plain node types, which will be exported to a .cnd-File..xml.Export as Sophora - XML
It is possible to export node types, node type configurations, and default property and childnode configurations as Sophora - XML. The resulting .xml file is a wrapper file, which contains the original node type export data created by the regular export mechanisms. The export data will be encapsulated within the Sophora XML as a CDATA block. The export of node types as Sophora XML works like you're used to, just make sure the box Export as Sophora-XML is checked properly.
Exporting node types: "Full" vs. "Minimal" (since version 3.2.0)
When exporting node types, you can choose between two types of export:
"Full" will not only export the node types themselves, but also supertypes, referenced node types (when using mixins or virtual properties), the necessary default property and child node configurations as well as referenced form field groups. This kind of export provides all configurations necessary to use the node types as they currently are.
"Minimal" is for exporting the selected node types only, which includes their CND and node type configuration. The export will make sure that the information for each node type is separated when creating the files, which can be useful for maintenance purposes or when re-importing specific node types.
Schema Files for Export Formats
For the export of the default properties, the default childnodes, and a node type's configuration, Sophora uses internal default DTDs. They can be found in the server's directory src/main/resources/dtd. If you want to provide alternative DTDs, create a "dtd"-Folder within the config-directory of your repository (not in the installation directory). Place the following files in this folder to overwrite/replace the default DTDs:
propertyDescription.dtdfor the default properties configuration,childNodeDescription.dtdfor the default childnode configuration, andnode typeDescription.dtdfor node type configurations
Importing Document Types or Configurations
- Open the view Administration, go to Document Configuration, open the context menu.
- Select Import...
- In the emerging dialog, you can specify one or more of the following documents to be imported:
- A
.cndfile that contains one or more node types, - A
.xmlfile that contains default properties configurations, - A
.xmlfile that contains default childnode configurations, - A
.xmlfile that contains node type configurations, - A
.xmlfile that contains form field groups.