Roles
In Sophora , users are assigned to one or multiple roles, which determine the permissions a user has. A user with two or more roles has all permissions that are granted him by each of these roles individually (see section "Users with Multiple Roles" for more details). Which permissions are granted by which role can be configured in the role editor.
Why You Should Use Roles
There are plenty of reasons why it is useful and important to use roles and to equip different users with different roles. Here are a few examples.
Most probably, not all of your editors are responsible for the same kind of documents. Some of them could only be responsible for creating, editing and managing teletext articles, some of them write articles for your website, and some of them organize the television schedule. While it is Sophora's great advantage, that you can configure and manage all these tasks with just one system, it could and likely will be a very confusing information overload for your editors. Hence, you can and should clear their view by restricting the kind of information each editor gets - that way they are able to concentrate on the things they are good at. For example, you can configure a role "teletext editor" and configure it in a way, that users with this role may only read and edit documents belonging to the teletext family, or just documents in or below your teletext structure node. If he has to assist in your website's editorial department, e.g. due to holidays or illnesses there, you can simply assign to him a "website editor" role, and he will be ready to work there.
For security issues, you may want to deny most users the right to change most or all system documents. You could configure a special role and assign to it all the permissions you need for administrating purposes. Then, if just one editor respectively from every department should be able to change system documents, you can assign to each of them this additional role. That way, you just have to configure one additional role and do not have to create two roles for each department (e.g. "teletext editor" and "teletext editor admin").
By restricting system permissions and system document permissions to a small set of users, you can prevent editors from accidentally breaking your system configuration.
Creating a New Role
- Open the Administration view.
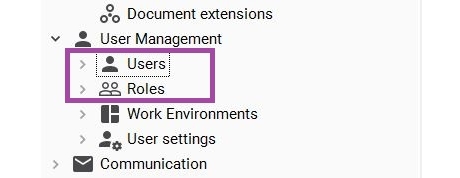
- Go to User Management >> Roles .There, open the context menu with a right-click.
- Select New: Role. The role editor opens up.
- To save the role, you have to enter a name first.
Editing a Role
- Expand the entry Roles within the administration view.
- Double-click the role you want to edit.
- The role editor opens, where you can edit the role according to your wishes.
- Do not forget to save the role, when you're finished.
The Role Editor
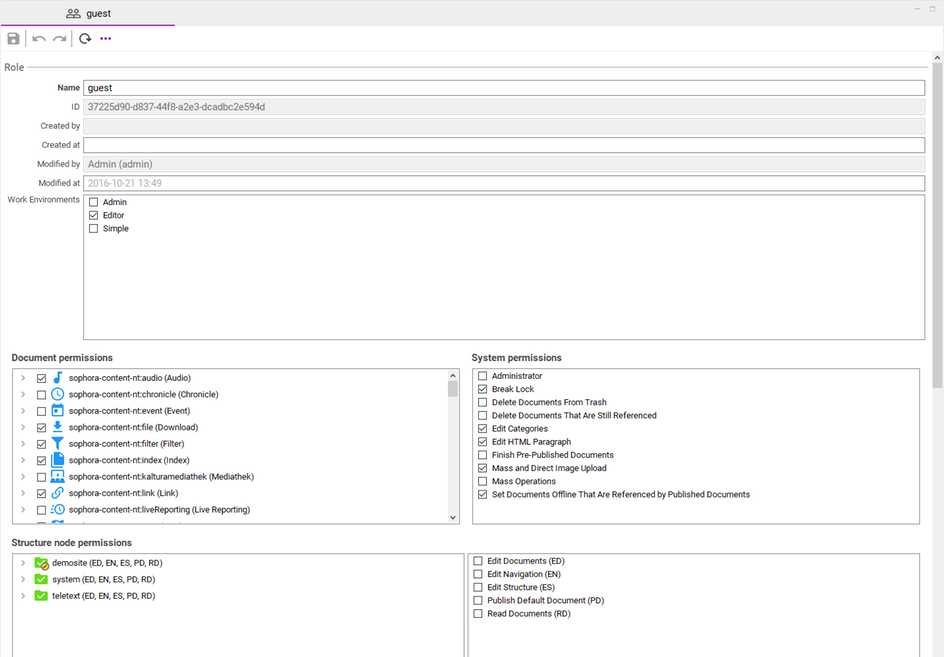
The form to configure a role looks like the one which you can see in the following screenshot. The field Name is mandatory; role names are unique, there cannot exist two different roles with the same name. The next fields show you the usual meta information, such as the document ID and the creation date. Below that, you can choose which of the published work environments should be made available to users with this role.
Subsequently, you will find the section to assign permissions. A detailed explanation about what permissions there are and what they mean can be found in the next section of this document.
At the bottom of the role editor, you will find a list of all users to which this role is assigned. You can open the corresponding user document by double-clicking on the user in the list.
Permissions
In general, there are five different kinds of permissions, which will be explained below:
- System Permissions
- Document Permissions
- Structure Node Permissions
- Proposal Section Permissions
- Tab Permissions
System Permissions
System permissions apply globally and are independent from any specific structure nodes or documents. These are all existing system permissions:
Administrator
Users which are equipped with the Administrator system permission receive more detailed information and can perform more actions throughout the Sophora DeskClient, for example:
- UUID and structure node document UUID are displayed on the meta tab of a structure node editor.
- Property tooltips display the actual key of the current property.
- The internal names of image variants are shown next to their label.
- They may export the entire structure tree or parts of it.
- All existing websites and all of their subordinate nodes are shown in the structure view.
- They can add new websites to the structure.
- They can search the archive repository for permanently deleted documents.
- The administration view is visible in its entirety; users may access all entries there.
Especially, the Administrator permission allows a user to create, modify and remove system documents such as node types, users, and form field groups, as well as configuration documents like pararaph styles and image variants.
Break Lock
A document is locked if a user is working on it. If a user with the break lock system permission tries to open such a document, he may break the lock without asking the current editor's permission first.
There is an execption from this: A user can always break his own lock even without the break lock system permission. This is new with Sophora Server versions 2.4.25, 2.5.23, 2.6.0 and newer.
Delete Documents From Trash
Only a user with this permission is allowed to delete documents permanently. Else, he or she may not remove documents from trash.
Delete Documents That Are Still Referenced
If any user tries to delete a document which is still referenced in a different one, he will be informed about this fact in a notification. Only users with this permission are then allowed to delete the document anyway.
Edit Categories
Only users with this permission are allowed to edit the category select values, which are shown in the view Categories .
Edit HTML Paragraph
Only users with this permission are allowed to edit copytext paragraphs of the HTML type.
Finish Pre-Published Documents
To publish one or more documents which are already pre-published, a user needs this permission.
Mass and Direct Image Upload
Users to whom this permission is assigned have the possibility to upload image files directly during the creation of a new image document. They will also have the right to upload multiple image files at once and create the corresponding Sophora documents. By denying this permission to a couple of users, you can prevent the Sophora server from high workload.
Mass Operations
Users need this permissions to perform mass operations, i.e. accessing operations for a whole search result via Search View >> More Actions
>> Search Result.
Set Documents Offline That Are Referenced by Published Documents
This one is probably self-explanatory.
Document Permissions
Document permissions restrict operations a role may execute upon certain document types. For example, a role might be configured in such a way that its users may read, create and save story documents but are not allowed to publish them. By default, document permissions are valid globally. However, you can constrain where they should or should not apply by combining them with structure node permissions. The following list contains all available document permissions.
- Create
- Read
- Save
- Release
- Publish
- Set Offline
- Delete
- Restore
- Clone
- Protect
It is not possible for any role to have the permission to publish a document without also having the permission to set it offline. Therefore, if you grant a role the permission Publish for a document type, Set Offline will also be granted. Vice versa, if you revoke the Set Offline permission, the permission for publishing a document will also be revoked automatically.
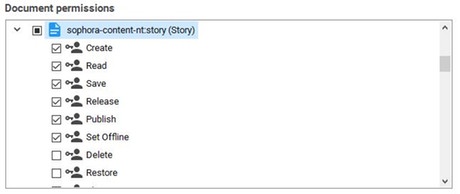
You may set some, none or all document permissions for each document type. If you want to grant a role all document permissions for a document type at once, you can just check the document type, instead of checking each permission separately. In the following example, for instance, users with that role may neither delete nor restore documents of the type sophora-content-nt:story, but may perform all other possible actions on this document type.
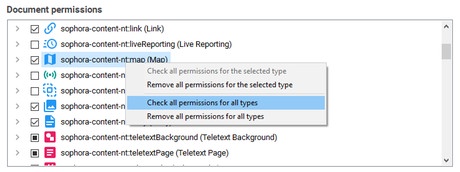
You can also grant or revoke all document permissions for a single one or even all document types at once via the context menu.
Permissions for New Document Types
Structure Node Permissions
Structure node permissions restrict operations to the enabled structure nodes. Some of these permissions affect just the structure node itself. Other structure permissions additionally depend on document permissions. The different structure node permissions are all listed and explained in this section. You cannot set permissions for disabled structure nodes. If you re-enable a temporarily disabled structure node, the permissions to this structure node will be restored within every role.
Edit Documents
Documents at a structure node may only be edited, if this permission is set for that structure node. This permission also depends on the document permissions. Thus, to edit a document at a structure node, a user has to have both the permission to edit documents at the structure node as well as the one to edit documents of that type (see: Document Permissions further above). For example, if a user has the permission to Edit Documents for the structure node home, but lacks the permission to edit documents of the type sophora-content-nt:story, he still won't be able to edit (create, save, ...) any story documents; in particular, he won't be able to edit any stories below the structure node home.
Edit Structure
This permission allows a user to create new subordinate structure nodes, or to rename, publish or delete existing ones.
Publish Default Document
Beside the corresponding document permissions, this permission must be granted to a user, so he is able to publish the default document of a structure node.
Read Documents
Documents at a structure node may only be read by a user, if this permission is set for that structure node in one of his roles. This permission also depends on the document permissions. Thus, to read a document at a structure node, a user has to have both the permission to read documents at the structure node and to read documents of that type (see: Document Permissions further above).
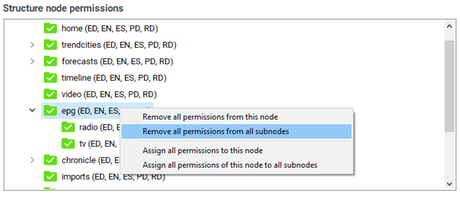
You can set or remove all of these structure node permissions for one specific structure node at once using the context menu. This way you can also remove all permissions from all subnodes, or assign the set of permissions of a node to all subnodes.
Modifying the Order of Structure Nodes
To allow a role to modify the ordering of structure nodes, the permission Edit navigation on the parent structure node is required. Thereby, the ordering of all immediately subordinate nodes may be changed (this can be done by dragging the selected structure node within the Structure view). To be able to publish this modified order, a role has to have the permission Edit structure on the parent node.
An example: To enable that the given role (whose structure node permissions are shown in the subsequent figure) may change the order of the immediately subordinate nodes of trendcities, the permission Edit navigation (EN) is selected at this node. Note, that a role with this configuration cannot alter the order of the subnodes of copenhagen. If the role shall be able to publish these changes, it has to have the permission Edit structure for the parent node (demosite in this case).
Moving Structure Nodes Across Multiple Layers
If a role should be allowed to move a structure node across multiple layers, it requires a combination of permissions on both the source and the target node of the structure node to be moved:
Source node:
- Edit navigation (EN) on the former parent node of the structure node to be moved: Enables, that the ordering may be changed at all.
- Edit structure (ES) on the former parent node of the structure node to be moved: The removal of a structure node is automatically published immediately.
Target node:
- Edit navigation (EN) and Edit structure (ES) on the new parent node of the structure node to be moved: This allows to add a new child node.
- Edit structure (ES) on the node superior to the new parent node: Required to publish the changes at the new parent node. (Thus, this permission is not mandatory for actually just moving the structure node.)

Required Permissions to Enable and Disable Structure Nodes
In order to enable or disable a structure node, a role needs to have the system permissions Administrator and Mass Operations in addition to the structure node permission Edit structure (ES).
Permissions for New Structure Nodes
Proposal Section Permissions
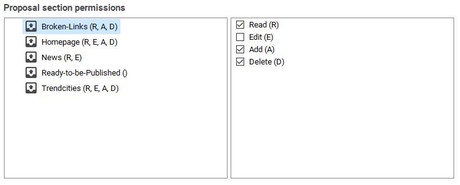
Proposal section permissions restrict operations upon document proposal sections. The available permissions for each proposal section are:
- Read (R): Proposals in this section can be read. Without this permission, a user cannot see this particular proposal section at all. Note, that the user must also have the document permission Read for a document's type to be able to read the correspondent proposal.
- Edit (E): The user can edit a proposal's comment and validity duration in this section. If a proposal is offered in different sections, a user can edit it when she has at least the edit permission for one section in which the proposal is offered. Implies the Read permission.
- Add (A): The user can add proposals to the section. Implies the Read permission.
- Delete (D): The user can delete proposals from the section. Implies the Read permission.
Permissions for New Proposal Sections
Tab Permissions
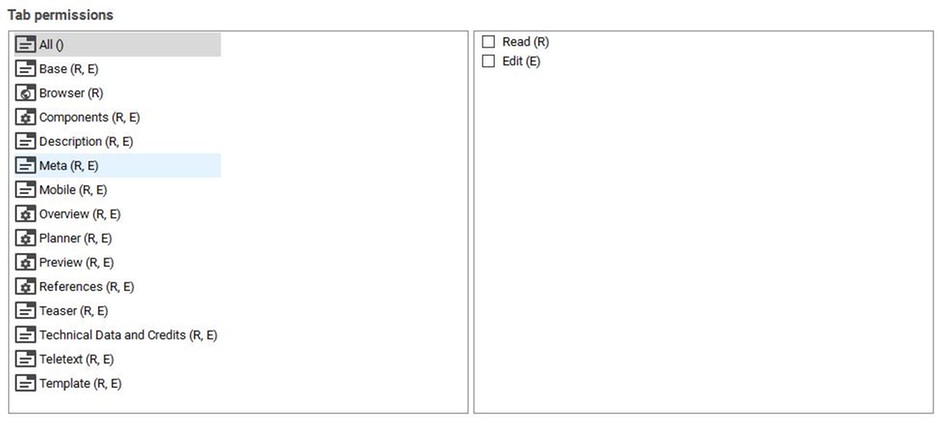
These permissions configure which of the flexible document tabs a user can see or edit. The available tab permissions are:
- Read (R): The user can see the tab and its content, but cannot edit the properties which are shown on the tab. If a user does not have the read permission for a tab, the tab is hidden, i.e. not shown along with the other tabs at the bottom of the document editor.
- Edit (E): A user needs this permission to edit the properties which are shown on the tab. This permission is only available for form and system tabs. Browser tabs make no distinction between read and edit mode.
Within the tab permissions section, you can double click on any tab entry to open the according tab document.
Permissions for New Tab Documents
Permissions on Input Fields
By default, users can edit all input fields of documents they are allowed to read and save (except for those fields that are defined as "Read only" explicitly). Optionally, each input field can be configured to require further permissions from users.
Restrict Editing of Input Fields by Document Permissions
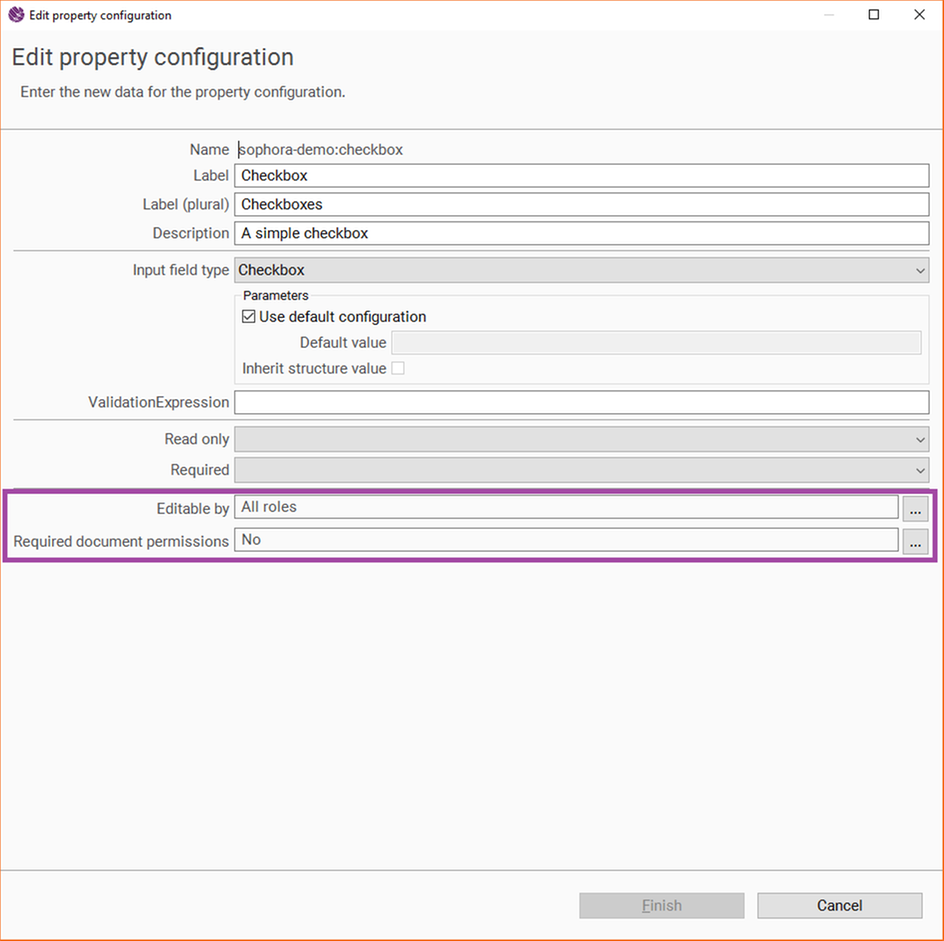
Input fields can be configured in a way, that only users with a specific document permission are allowed to edit the field. For example, you may want to configure the title of a document in a way, that only users who can also publish their changes are allowed to edit the title.
To do so, simply pick all the document permissions that should be required to edit the property in the corresponding document permissions picker of the property configuration. If no document permission is checked, users do not need a specific document permission to edit the property. Otherwise, only administrators and users that have all required document permissions for the document type the property belongs to can do so.
Restrict Editing of Input Fields by Roles
An input field can also be made editable only for users having a certain role. Only administrators and users who belong to at least one of the specified roles are allowed to edit the field. For all other users, the field appears read only. The required roles can be selected within the property configuration wizard of the administrator section of the DeskClient by a role picker. By default, all roles are selected.
Creating a New User
- Open the view Administration
- Go to User Management >> Users
- Open the context menu and select New: User
- An empty user editor opens. Enter at least a Username and a Password. Those fields are mandatory.
- Though it is not mandatory, you should also assign him at least one role.
- Save the user.
Editing a User
- Expand the entry Users within the administration view.
- Double-click the user you want to edit.
- The user editor opens, where you can edit the user according to your wishes.
- Do not forget to save the user, when you're finished.
The User Editor
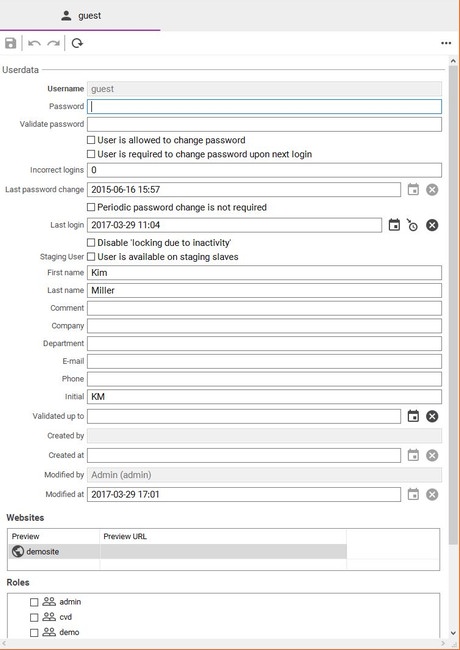
The user editor looks like the one you can see in the screenshot on the right. You will learn more about the functionalities later on. First, you will see the input fields Username, Password, and Validate Password. Those fields are mandatory for every user. After you have created a user, the field Username cannot be changed anymore and becomes read only. You will learn more about the field Password in one of the following paragraphs.
After that, there are a few text fields and checkboxes also concerning your password settings, followed by some input fields for personal information about your users, like first and last names or their phone number. Below are some meta informations about the creation and modification of the user document.
In the box Websites, you can customize the URL for each preview document. This is intended for users working at remote sites, who need to use a different URL to access the preview server than users working at the main office.
In the box Roles, you can assign one or more roles to the user. The user can only log in to your system, if he has at least one role; without any role, the Sophora server will deny a connection.
Users With Multiple Roles
A user who has multiple roles is permitted to execute all actions, that at least one of his roles provides to him individually due to its permission configuration. However, permissions are not merged. We should give you a few examples:
Role A may read story documents at structure node X; role B may create story documents at structure node X. Thus, a user with both roles A and B may read and create story documents at structure node X.
Otherwise, consider that role C may read story documents at structure node X, while role D may create image documents at structure node Y. A user with both roles C and D may neither create story documents at structure node X, nor is he able to read story documents at structure node Y or create image documents at structure node X.
Setting up a Password
Due to security issues, every Sophora user account must be secured by a password. Hence, the field password is mandatory for every user document. If you create a new user, you have to enter a password for him or her in that field, and confirm it by entering the same password again in the field Validate password. If you save the document, both fields will be flushed. This does not mean the passwords are lost; they are still saved in the background.
If you want to change the password for an already existing user, just enter a new password in both fields. After you saved the user document, both fields will again be empty, but the new password is now the valid one and has overwritten the old one.
Password Rules and Validation
To ensure all passwords meet a certain security standard, you may define a regular expression, that all (new) user passwords have to comply with. For this purpose, you have to specify a regular expression in the configuration setting user.password.regex. Additionally, you may also add a description for this regular expression, which will be shown to those users who enter an invalid password (one that is not consistent with the regular expression). Just enter such a description in the configuration setting user.password.regex.description.
For a thorough synopsis of possible components of your regular expression, please refer to the Java Documentation.
Letting Users Configure Their Passwords by Themselves
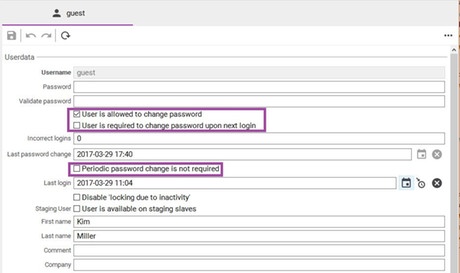
Maybe, some users should be able to set their password themselves. If you check the box User is allowed to change password, they can do so by selecting User >> Change user data... and entering a new password there.
Password Expiry
User passwords may be configured to expire after a certain amount of days. The configuration setting sophora.authenticate.changePasswordAfterDays specifies the duration in days, after which users are required to change their password. This setting applies to all users in your system. You can prevent the password of a specific user from expiring by checking Periodic password change is not required in the specific user document. In that case, the password will not expire even if it is unchanged for more than the number of days in the configuration setting.
You can also force a user to change his password by checking User is required to change password upon next login. If the user logs in the next time, he has to change his password before doing anything else. This works even if the user usually is not allowed to change his password by himself. This function could be useful if you discovered that your system has been compromised and all users should change their password.
Password Lost
To enable the "password lost" function for users, the following settings must be done in the sophora.properties file of the server:
| Property | Description | Example |
|---|---|---|
| sophora.mail.smtp.host | The host name of the SMTP server that is used to send mail. | mail.example.com |
| sophora.mail.sender.email | The e-mail address that is used to send mail by the Sophora server. | sophora@example.com |
| sophora.mail.sender.name | The name that is used as the real name to send mail by the Sophora server. | Sophora |
| passwordLost.mail.subject | The subject of mails that are sent to users containing the code for the "password lost" function. This can be set in the configuration document in the administration section, too. | Your Sophora account password |
| passwordLost.mail.text | The text of mails that are sent to users containing the code for the "password lost" function. ${code} inserts the actual code. \n inserts a line break. This can be set in the configuration document in the administration section, too. | Enter the following code to set a new password:\n\n${code} |
Incorrect Logins
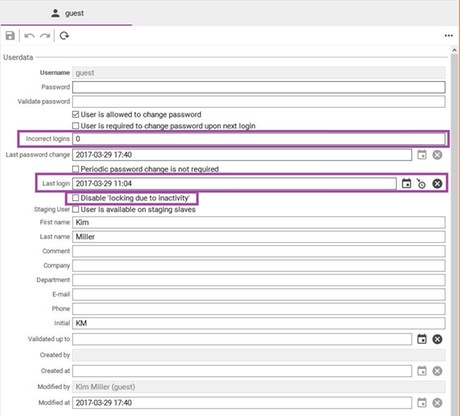
By default, users are able to try to login into the DeskClient unlimited times, even if they enter a wrong password. The number of invalid logins can be limited in the sophora.properties file of the Sophora server. The parameter sophora.authenticate.checkForIncorrectLogins determines whether the server checks for invalid logins (if a user enters his password incorrectly several times) and locks the account after a number of failed login attempts. By default, this check is disabled. The parameter sophora.authenticate.incorrectLoginCount declares how many times a user may enter a wrong password before his account is locked. The default value is 3 times.
Account Expiry
User accounts may be configured to expire after a certain time of inactivity. The configuration setting sophora.authenticate.expireAfterDays specifies the duration in days after which a user account expires if the user has not logged in into the Sophora server during that time.
Additionally, a user account may be prevented from expiring by ticking the checkbox Deactivate 'locking due to inactivity' in that account.
User accounts that have administrator rights will never expire, regardless of configuration.
To unlock an expired account, set the account's last login date to the current date in that account's editor.
An additional help text that will be displayed in the error dialog when the user tries to log in can be configured using the sophora.authenticate.expireAfterDays.help configuration setting.
Staging User
There is the possibility to replicate a user to the Staging Servers. This requires the checkbox User is available on Staging Servers to be activated. Users will be stored on the Staging Servers without the personal data.
If there already is a user with the given username on the Staging Server and this user has not set the flag User is available on Staging Servers, the user will not be deleted on the Staging Server. This allows to create local users on the Staging Server or to grant other passwords.
Search user
This editor is accessible from the admin view via User Management >> Users, and then the context menu entry Search User.
Users can be searched by their properties as Full name, Phone or by roles like guest. There are also other filter mechanisms which you can see in the following illustration. The search result is shown in a table, where you can open the user document by double clicking the search result. Multi selections are also possible. The context menu (right click on at least one user) contains operations for editing and exporting one or more users at once.
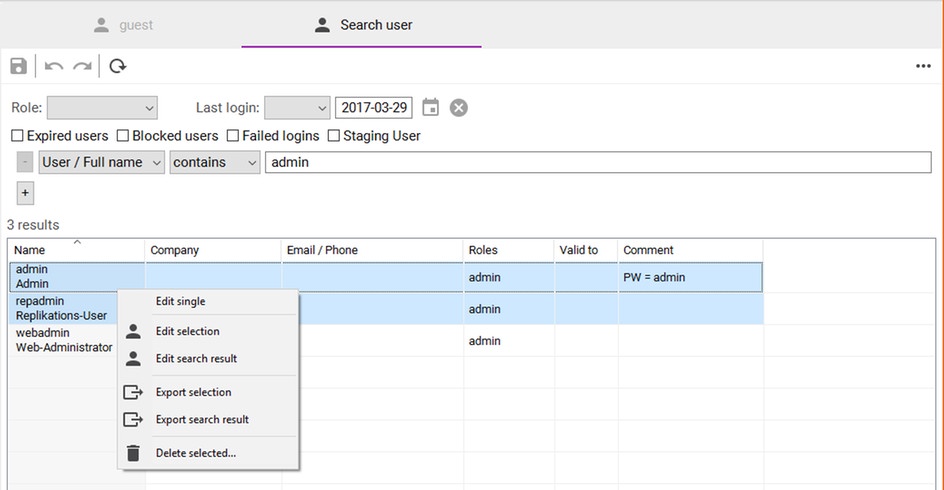
You have different options available in the context menu, which are:
- Edit single: Open each of the selected users in a separate user editor.
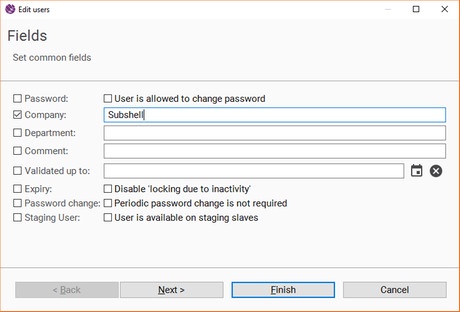
- Edit selection: Open the form Edit users for editing all of the selected users at once.
- Edit search result: Open the form Edit users for editing all of the users from the search result at once.
- Export selection: Open an export wizard for exporting the selected users as a single Sophora-XML.
- Export search result: Open an export wizard for exporting all users from the search result as a single Sophora-XML.
- Delete selected...: Delete the selected users.
Im- and Export of Roles and Users
Roles and users can be exported from the Sophora DeskClient. In contrary to usual documents, you cannot export them as .json-Files. To export them as Sophora-XML, select the users or roles you want to export in the Administration view and select Export... in the context menu. You can export a single role or user, but also multiple at once.
Importing roles and users can be done by the Sophora Importer or by using the Import... entry in the context menu of roles or users. Detailed information about the importing procedure as well as the Sophora XML specifications can be found in the Importer's documentation.