Image documents usually do not only consist of a single image but have several variants. For example, image variants can include teaser images, a large text image or a small text image. In the delivery, the variants of an image will then be used at appropriate places.
The standard workflow is to create an image document using one original image, from which the variants are automatically generated. It is also possible to manually specify the images to be used for each variant.
Creating a New Image Document
- Create the image document via the toolbar. Click New
>> Image.
- As usual, select a structure node and enter an id-stem. You may also specify a document template, if you wish to use one.
- For uploading image files directly, or for uploading multiple images at once, please see the next section.
Please also note that depending on the image format and factors such as color depth and color profile, image information may get lost (for example, uploaded TIFF images with a color depth of 16 bits per channel may not be displayed correctly).
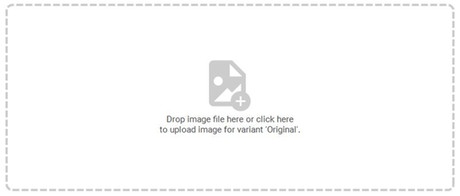
You can now add an image file either by simply dropping one in the box at the bottom of the document (the one you can see on the right), or by clicking on the icon in the box and uploading one by use of the dialog.
If you later want to choose a different image, click the button Upload image for variant 'Original' below the image. It will open a dialog, where you can select a different one.
Creating Multiple Image Documents at Once
You can also upload multiple image files and create the corresponding image documents at once. Each image file will be used as original for the according image document. The remaining fields are filled with uniform information for all created image documents, so that the creation of an image collection (and thereby the creation of multiple image documents) differs from the creation of a single image document (see above).
You may also use this way if you want to create just one document, but you wish to upload the image right away:
- Select New
>> Image in the Toolbar.
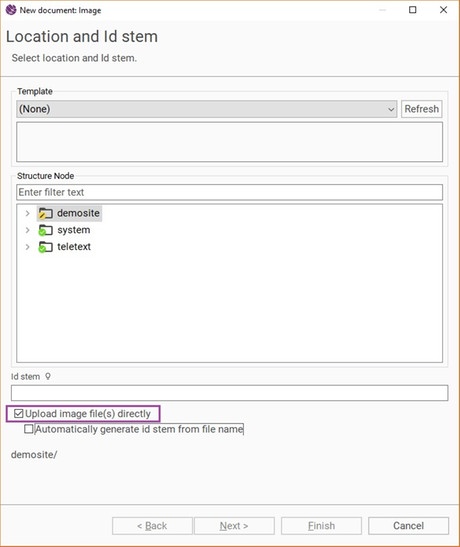
- Within the emerging dialog: Select a structure node, then check Upload Image file(s) directly.
- You may also provide an id stem which is then used by all images, or you can check Automatically generate id stem from file name as well. In that case, every newly created image will have an id stem according to its file name.
- Click Next.
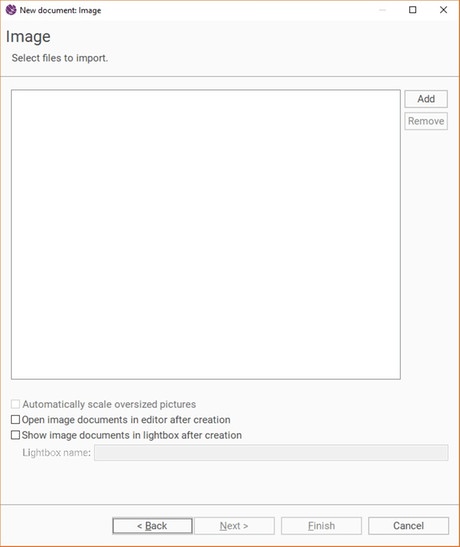
- On the next page of the dialog you will have to select the image files you want to upload. These files will be used as originals. You can either select them by clicking Add, or you can drag and drop them into the dialog.
- You might want to check the boxes Show image documents in lightbox after creation and/or open image documents in editor after creation. If you choose to show images in a lightbox after creation, you will also be able to set a name for the lightbox. If the field is left blank, a name will be generated.
- If there are properties, you want to edit immediately, or if your image documents contain mandatory fields, you have to click Next. Otherwise, you can already select Finish.
- If you chose Next, you may now fill in the properties and/or mandatory fields which you see in the dialog. They will be be the same in every separate document you created.
- Click Finish to create the image collection.
You can cancel the upload process anytime by clicking Cancel. If you started the creation of the new image documents from within the component structure, the images will be added to the component group automatically.
Display of Variants
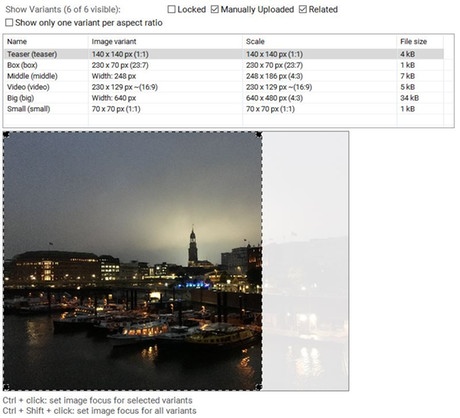
The Base tab shows the list of image variants. For each variant, the size constraints, the resulting actual variant size and the file size are shown. For image variants that only have a specified aspect ratio this information cannot be determined though. By default, only active variants are shown. Using the checkboxes above the list, the display of locked, manually uploaded, and related variants can be configured.
Cropping
Below the list of variants, the crop of the selected variant is shown. To change the cropping of a particular variant, select it in the table. Drag any of the black-marked corners until you have found the correct size. The selection can be moved by clicking in the middle and dragging it. The cropping cannot be made larger than the original image.
You may also select an image focus for one ore more variants. The size of the crop then is adjusted automatically. For this purpose, select the desired variants and press Ctrl. Subsequently, adjust the crosshairs to the point which is supposed to be the new focus and left-click. If you want to select a new focus for all image variants at once, press Ctrl+Shift before you left-click. In each case, you will get an information if the change was successful.
Manually Uploading an Image for a Variant
An image can be manually uploaded for a variant using the following steps:
- Select the variant in the list of variants or on the Variants tab.
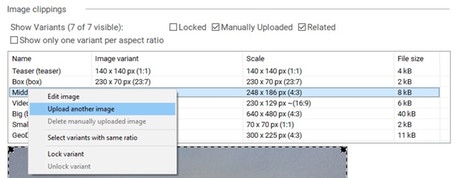
- From the context menu, choose the option Upload another image.
If you are not able to see the new variant in the list, ensure that the checkbox Manually Uploaded above the table is activated.
The size contraints of a variant do not apply to a manually uploaded image. Also, cropping can not be used.
A manually uploaded image can be removed using the context menu option Delete manually uploaded image. The variant will then be reset to an image generated from the original image. Note that also the image focus will be reset.
Locking Variants
An image variant can be locked. A locked variant is not available in the delivery. If the size constraints in the variant definition (set by the administrator) are larger than the original image, the variant is automatically locked. It can then not be unlocked. Instead, an image for this variant can be manually uploaded.
A variant can be manually locked as follows:
- Select the variant in the list of variants or on the Variants tab.
- From the context menu, choose the option Lock variant.
Locked variants are only shown in the table if the checkbox Locked above it is activated.
A manually locked variant can be unlocked as follows:
- Select the variant in the list of variants or on the Variants tab.
- From the context menu, choose the option Unlock variant.
- Alternatively, you can manually upload an image for the locked variant.
Settings and Effects for each Image Variant
The following settings can be applied to each image variant:
- A sharpening effect
- The JPEG compression ratio
These settings can be changed using the image editing dialog, which is accessed as follows:
- Select the variant in the list of variants or on the Variants tab.
- From the context menu choose the option Edit image.
- The dialog can also be opened by double-clicking on the variant in the list of variants or on the Variants tab.
Editing Image Variants
Only variants generated from the original image can be edited, not manually uploaded ones.
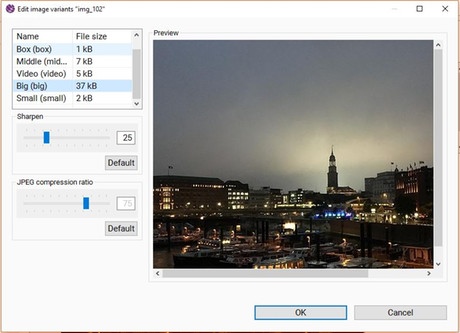
The image editing dialog shows a table of editable variants on the upper left, the settings on the lower left, and a preview of the image on the right. The settings and the preview apply to the variant selected in the table. The settings can later be changed without loss of image quality. They are "non-destructive", i.e., they are saved in addition to the image data and are applied only in the preview and the delivery.
Default values for the settings can be set by the administrator in the definition of the image variant. The Default button resets a setting to the default value. If a default value from the variant definition is used, the value is displayed in a light grey colour.
