Introduction
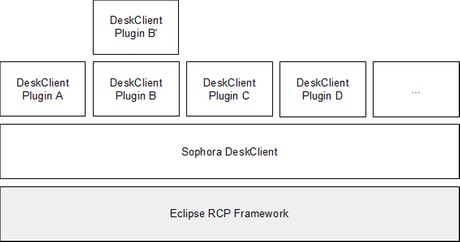
The Sophora DeskClient is a rich client application based on the Eclipse RCP framework. Therefore it is possible to extend it with custom plug-ins.
This tutorial describes in short when and how to develop your own custom plug-in and how to deploy it to your users.
The tutorial does not explain the Eclipse IDE, the Eclipse RCP, the Standard Widget Toolkit (SWT), JFace or the administration of a Sophora installation (see References).
Preconditions
For developing your own Sophora DeskClient plug-in you need:
- Eclipse (RCP), SWT / JFace knowledge,
- an installed Eclipse IDE for J2EE Developers (4.7.1 or later) with e4 tools plugins,
- the official Sophora DeskClient 4.0.0 or higher,
- an Eclipse target platform corresponding to the Sophora DeskClient (see Setting Up Your Development Environment),
- a running Sophora Server corresponding to the Sophora DeskClient for developing and testing your plug-in and
- knowledge about modeling, creating and configuring Sophora document types (see Sophora Administration Handbook).
When Do I Need A Custom Plug-In?
Typically you need a custom plug-in if users have to link or paste contents from external sources into Sophora documents directly and in a comfortable way, or if (complex) contents have to be edited in a way the Sophora DeskClient does not support yet (e.g. using a special input field).
You should make sure that Sophora does not already support your demands before you begin developing your own plug-in. In many cases you can use
- fields based on select values
- dynamic tables
- custom property tabs
- custom browser tabs
- scripts (client scripts, validation scripts, ...)
- ...
What Can Be Extended By A Custom Plug-In?
Because the Sophora DeskClient is an Eclipse RCP application, it is theoretically possible to extend everything that is extendable by the Eclipse RCP.
This includes the editors, views and so on by extending the application model with a fragment, e.g.
- Toolbars
- Commands and handlers
- Menus
- ...
Moreover the Sophora DeskClient provides its own extension points for
- custom input field types
- editor tabs for the Sophora document editor, and
- custom (background) jobs running at startup of the DeskClient.
Sophora DeskClient extension points:
com.subshell.sophora.eclipse.formInputFields(see Adding Form Input Field Types)com.subshell.sophora.eclipse.editorComponents(see Adding Editor Components)com.subshell.sophora.eclipse.workbenchStartupJobs(see Adding Startup Jobs)
Setting Up Your Development Environment
Before you can begin developing a plug-in for the Sophora DeskClient, you have to create a corresponding Eclipse target definition.
This definition must contain at least the Sophora DeskClient (ga-none-with-src also provides Javadoc) and additional plug-ins if required, e.g.:
- Eclipse SDK 4.7.1a
- Babel Language Packs (for the languages you want to support)
- Any other plug-ins and features your custom plug-in will need
Because you want to develop a plug-in for the Sophora DeskClient you will need the Sophora DeskClient in your target platform. Extract it to a folder, e.g. called "[...]/targetplatform", so you have a folder "[...]/targetplatform/DeskClient".
Now start your Eclipse IDE with a new, fresh and empty workspace. Create a new general project and name it e.g. "com.example.targetdefinition". In that project create a new target definition by navigating to File > New > Other > Plug-in Development > Target Definition.
Give a filename and select "Nothing: Start with an empty target definition". Afterwards add the folder with the DeskClient as location. Choose "Installation" as content. Add additional locations as required.
In the editor of the target definition select "Set as Active Target Platform" to use this definition.
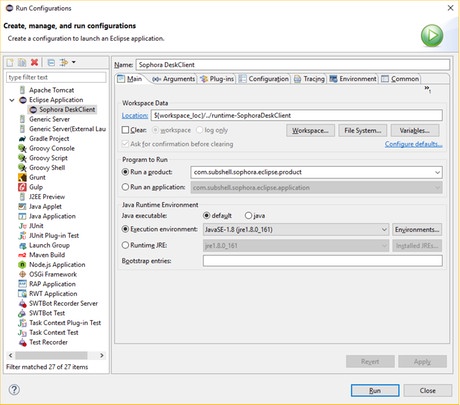
Afterwards create a new Run Configuration for an Eclipse Application. Give the configuration a speaking name like "Sophora DeskClient" and set the product to run to "com.subshell.sophora.eclipse.product" on the Main tab.
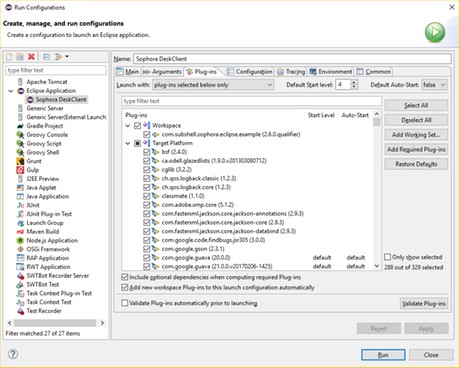
Switch to the Plug-ins tab, set Launch with to plug-ins selected below, deselect the whole Target Platform, select all com.subshell.sophora.eclipse.* plug-ins and press the Add required Plug-ins button.
If you now run the application the login dialog of the Sophora DeskClient should appear. A successful login to a running Sophora Server completes the setup.
An Example Custom Plug-In
The following custom Sophora DeskClient plug-in provides two new input field types to the Sophora document editor. These fields are for selecting a single person or several persons out of a third party (dummy) database.
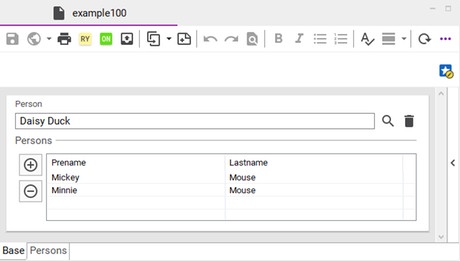
Furthermore the plug-in provides a new Sophora Document Editor tab for a custom UI to edit parts of a Sophora document.
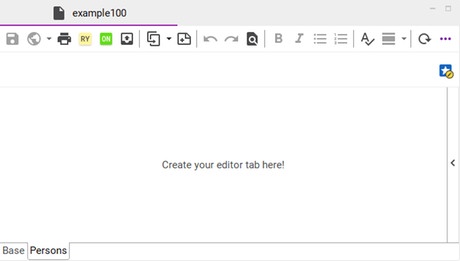
A background job running at startup of the Sophora DeskClient (e.g. for filling a cache) is also contained.
Finally a custom view has been added to the view menu and next to the bookmarks view.
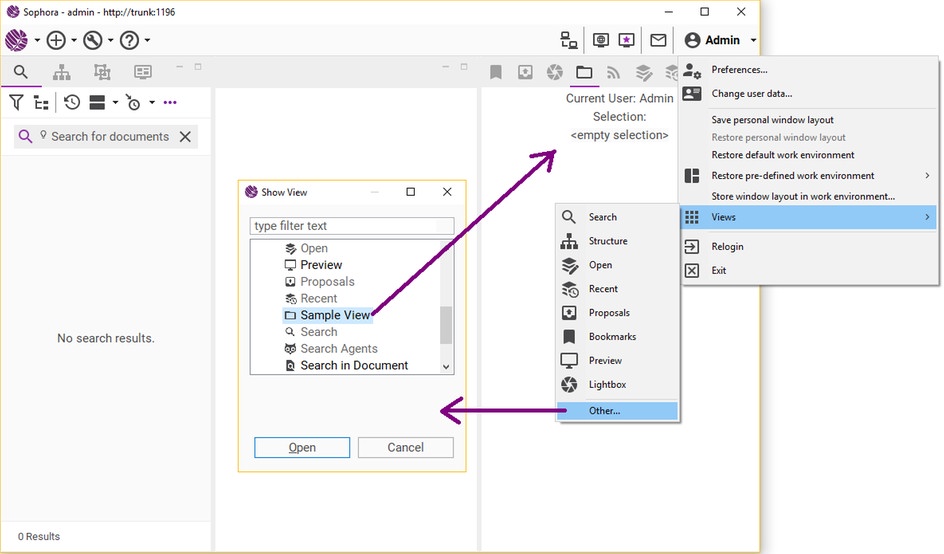
Download The Example Plug-In
Please contact us if you are interested in our sample plug-in archive. It contains four Eclipse projects:
- The example Sophora DeskClient plug-in (
com.subshell.sophora.eclipse.example), - a feature project (
com.subshell.sophora.eclipse.example-feature), - an update site project (
com.subshell.sophora.eclipse.example-site)and - a parent project (
com.subshell.sophora.eclipse.example.parent)
Run The Example
To run the Sophora DeskClient with the example plug-in:
- Set up your development environment like described in Setting Up Your Development Environment.
- Download the example projects archive (see Download The Example Plug-In) and import the contained Eclipse projects into your Eclipse IDE workspace.
- Add the example plug-in to your Run configuration and start the Sophora DeskClient from within your Eclipse IDE.
- Connect to a running Sophora Server as administrator.
- Navigate to the Administration view and import the node types and node type configuration files you can find in the example Sophora DeskClient plug-in project in folder "
[...]/com.subshell.sophora.eclipse.example/nodetypes".
Now you can create a new Sophora document that contains the new input field types and editor tab added by the example plug-in using File > New > Demo > Extended fields.
Creating A Custom Plug-In
If you create your own plug-in project it is necessary that your plug-in depends on the com.subshell.sophora.eclipse plug-in to use the Sophora DeskClient extension points and classes.
Do not forget to add your plug-in (and all its dependencies) to the Run Configuration created in Setting Up Your Development Environment. Otherwise your custom plug-in will not be started within the Sophora DeskClient if you run the product from within the IDE.
Adding Input Field Types
The Sophora document editor works with two kinds of input field types:
- Form Input Fields: "Simple" input fields that can read/write values from/to a single-value or a multiple-value property of a Sophora document.
- Editor Components: "Complex" input fields, that can read/write values from/to existing or new child nodes of a Sophora document.
Adding Form Input Field Types
If you only want to read and write single data in Sophora documents, you can handle this with a simple property in the document's node type. To add new input field types working on properties your plug-in has to extend the extension point com.subshell.sophora.eclipse.formInputFields and add a formInputField for each new field.
Every form input field type needs a unique ID (unique in plug-in scope) and a human-readable name. The ID is stored internally and the name is displayed in the node type configuration when configuring the field type for a node type's property.
Moreover the form input field type has to declare which property type(s) it supports (e.g. string, boolean, date, ...; single or multiple). It also can optionally declare whether it supports a character counter or a minimum number of rows and whether it requires a select value provider.
If not declared, the default is true meaning that you can configure these attributes in the property configuration of your new form input field type. If set to false these fields won't appear in the property configuration.
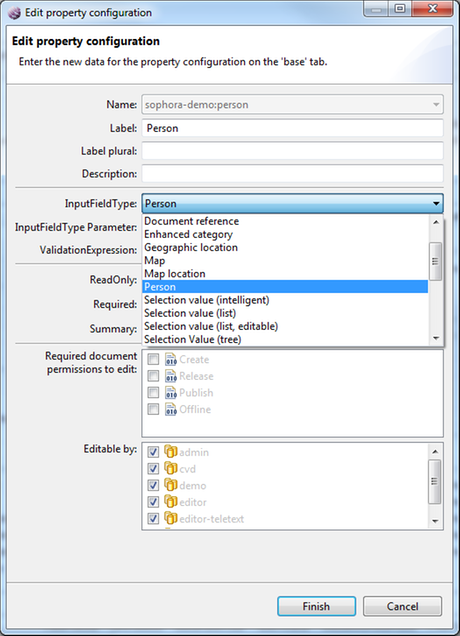
Finally there has to be an implementing class that implements the interface com.subshell.sophora.eclipse.editor.form.IFormField. Although it is possible to implement the interface directly, it is generally recommended to extend com.subshell.sophora.eclipse.editor.form.AbstractFormField instead. (See plugin.xml and com.subshell.sophora.eclipse.example.formfields.PersonFormField from the example custom plug-in.)
Adding Editor Components
If your data model demands a more complex UI structure than can be handled and stored in a simple property, you might need to use child nodes in a Sophora document type and an input field that works on that structure.
In this case you have to extend the extension point com.subshell.sophora.eclipse.editorComponents with an editorComponent. Like form input fields, every editor component needs a unique ID (unique in plug-in scope) and a human readable name.
The ID is stored internally and the name is displayed in the node type configuration when configuring the editor component for a node type's child node.
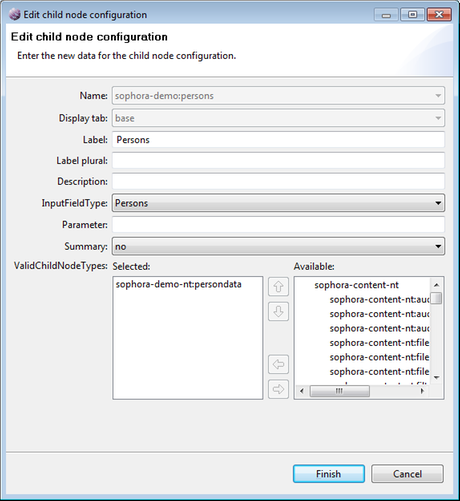
Among other things, the editor component needs an implementing class that implements the interface com.subshell.sophora.eclipse.editor.extension.IEditorComponent. Although it is possible to implement the interface directly, it is generally recommended to extend com.subshell.sophora.eclipse.editor.extension.AbstractEditorComponent instead. (See plugin.xml and com.subshell.sophora.eclipse.example.editorcomponents.PersonEditorComponent from the example custom plug-in.)
Adding Editor Tabs
Editor components may optionally provide a new custom tab to the Sophora document editor. These tabs have to implement the interface com.subshell.sophora.eclipse.editor.IExtendedEditorPart. They have to be provided by a com.subshell.sophora.eclipse.editor.extension.IEditorComponentTabProvider that is returned by the method getEditorTabs() in your IEditorComponent. (See com.subshell.sophora.eclipse.example.editorcomponents.PersonEditorComponent.getEditorTabs() and com.subshell.sophora.eclipse.example.editorcomponents.PersonEditorPart from the example custom plug-in.)
Testing Input Field Types
To test your custom input field types manually you have to add the needed properties and child node definitions to a document's node type in your server repository. Then configure the document's node type to use the new input field types. Afterwards create or open a document of the configured node type and your input fields will be shown in the editor.
Of course you can also test your custom input fields automatically using JUnit or plug-in tests to see if the fields are modifying the model in a correct way.
Adding Startup Jobs
If you want to do some long-taking operations at each startup of the Sophora DeskClient (like filling a local cache from an external database), you have to extend the extension point com.subshell.sophora.eclipse.workbenchStartupJobs. This extension point provides one or more job factories (workbenchStartupJobs), whose jobs will be executed in the background when the DeskClient is started. (See plugin.xml, com.subshell.sophora.eclipse.example.startupJobs.JobFactory and com.subshell.sophora.eclipse.example.startupJobs.LongTakingJob from the example custom plug-in.)
Adding Custom Views
Of course it is possible to add custom views to the DeskClient by providing a part descriptor in an application fragment and implementing your own class.
Using a perspective extension (org.eclipse.ui.perspectiveExtensions) the custom view can be integrated into the default Sophora DeskClient perspective (ID: com.subshell.sophora.eclipse.perspective).
Getting the SophoraClient
In some cases the current instance of ISophoraClient is needed, e.g. if your plug-in provides an own view that has to communicate with the Sophora Server itself. To get it, just let a ISophoraClientProvider be injected in your application model contributing class, e.g. in the constructor:
@Inject
public CustomView(ISophoraClientProvider clientProvider) {
	this.clientProvider = clientProvider;
}
In any other case, just use the following line of code:
ISophoraClient client = SophoraPlugin.getDefault().getSophoraClient();Deployment of Custom Plug-Ins
Once you have created your own DeskClient plug-in, this plug-in has to be deployed to all workstations. Depending on the deploy mechanism you use for the DeskClient, you can
- pack the built custom plug-ins into the DeskClient deploy package, or
- set up a separate update site for your custom plug-ins.
For the first case you only need to build your plug-ins (e.g. in the Eclipse IDE) and copy them (and all dependencies) into the "plugins" folder of the DeskClient. Afterwards pack the DeskClient into an archive file and deploy it as you have done with the unmodified DeskClient before.
In the other case you need a feature project that contains your plug-ins (and all dependencies) and a site project that contains your feature. (See the projects com.subshell.sophora.eclipse.example-feature and com.subshell.sophora.eclipse.example-site from the example custom plug-in.)
Build the update site and deploy it to a web server (next to the update site you use for the unmodified Sophora DeskClient).
Now every DeskClient needs to know the URL of that update site. This can be configured in the user preferences or in the deskclient.ini. The next time the DeskClient is started it will search the new update site for new features and plug-ins to install.
Building A Custom Plug-In With Maven
The custom plug-in can be build head-less using Maven, e.g. to be built by a continuous integration server like Hudson or Jenkins.
The example plug-in contains Maven pom.xml files and is built using Maven Tycho. This is an extension to Maven for building Eclipse plugins, features and related artifacts.
Setup
If not already done the target-platform needs to be converted to a p2 repository. The following batch file converts an eclipse installation directory into a p2 repository; adapt it to your local paths.
@echo off

set ECLIPSE_HOME=C:/path/to/eclipse/that/should/build/the/p2-repository/eg/targetplatform/eclipse
set SOURCE=C:/path/to/target/platform/that/should/be/build/as/p2-repository/eg/targetplatform/eclipse
set TARGET=file:%CD%/targetplatform_p2

"%ECLIPSE_HOME%/eclipsec.exe" -debug -consolelog -nosplash -verbose ^
    -application org.eclipse.equinox.p2.publisher.FeaturesAndBundlesPublisher ^
    -metadataRepository "%TARGET%" ^
    -artifactRepository "%TARGET%" ^
    -source "%SOURCE%" ^
    -compress -publishArtifacts
Note: Mac users have to call ./eclipse ... in path Eclipse.app/Contents/MacOS since the file eclipsec.exe does not exist.
Now, the path to the p2 repository needs to be referenced by the Maven pom.xml in the com.subshell.sophora.eclipse.example.parent project. This pom.xml references the p2 repository using the property deskclient.p2.url. Change these to point to the p2 repository you just created.
The path is an url, and must therefore be prefixed with "file:" if a path on the local harddisk is referenced. You can also set the properties in your Maven settings.xml instead, using a profile.
We recommend this if you are using a continuous integration server, as then the paths need not be checked into your SCM.
Building
Once the p2 repositories are set up, you can build the example plug-in, feature and update-site by changing into the directory com.subshell.sophora.eclipse.example.parent and running the following command on the command-line:
mvn clean packageAfter the build, the update-site can be found in the directory com.subshell.sophora.eclipse.example-site/target.
Books about Eclipse RCP Development
- Eclipse Rich Client Platform: Designing, Coding, and Packaging Java Applications by Jeff McAffer, Jean-Michel Lemieux and Chris Aniszczyk (Addison-Wesley) (ISBN-10: 0321603788, ISBN-13: 978-0321603784)
- Eclipse: Building Commercial-Quality Plug-ins by Eric Clayberg and Dan Rubel (Addison-Wesley) (ISBN-10: 0321553462, ISBN-13: 978-0321553461)
- http://www.eclipse.org/resources/
